Thursday, April 20, 2017

Shrimp Scampi Risotto

Hey there, happy Thursday!! We are almost to Friday!
Sometimes you want to cook a fancy dinner, whether it's to celebrate a birthday, holiday, achievement, or just simply because you want to! This shrimp scampi risotto is so delicious & fancy, yet so simple to make! I've always loved shrimp scampi, as well as risotto- the result of combining the two dishes is pure perfection! 

Let's get to cooking!

Shrimp Scampi Risotto (serves 8)

  • 40 large shrimp, peeled and devained
  • 16 oz arborio rice
  • 2 quarts chicken stock
  • 1/2 cup + 1/4 cup medium diced shallots
  • 10 garlic cloves, minced
  • 2 tablespoon grass-fed butter
  • 2 tablespoons olive oil
  • 1/4 cup chopped fresh parsley
  • 1/4 cup fresh lemon juice
  • salt and pepper, to taste
  • 1/2 cup dry white wine (plus another 1/4 cup for shrimp)
First we are going to make the risotto, since it takes a little time to make! Heat all of the chicken stock in a pot over medium heat until boiling, reduce heat to low and keep hot.

Heat olive oil and butter in a large pan over medium-high heat. Once hot, add 1/2 cup shallots and half the garlic. Saute until softened. Season with salt and pepper. Add in rice and stir until mixed in with shallots and garlic. Add white wine and let fully absorb into the rice. Now start ladling in 1 cup of hot stock into the rice at a time, and repeat until rice is tender.

Once the risotto is finished, we are going to make the shrimp scampi! Coat a large pan with olive oil over medium high heat. Once hot, add the rest of the shallots, garlic, and parsley. Saute until softened. Now add in the shrimp and cook on each side for about 2-3 minutes, or until translucent. Add in 1/4 cup white wine and 1/4 cup of lemon juice, and let come to a boil. Season with salt and pepper.

This is where we combine the two! Pour shrimp scampi into the risotto, then fold in. Season with more salt and pepper if desired. Serve with fresh parsley and lemon wedge. Devour and enjoy!

-Juliet

Tuesday, March 21, 2017

Mint Pots de Creme with a Strawberry Reduction & Honey Whipped Cream

Happy Tuesday! I hope your week is off to an amazing start.
These mint pots de creme are sure to make your week even more amazing! Since yesterday was the official beginning of Spring, I figured this was the most perfect recipe to share! Pots de creme, which means "pot of cream" is a classic French dessert made with cream and eggs. The texture is super creamy and light, and the mint flavor is so refreshing and flavorful! To top it off, this creamy custard is finished with a sweet strawberry mint reduction and homemade honey sweetened whipped cream. 
Onto the recipe!

Mint Pots de Creme with a Strawberry Reduction & Honey Whipped Cream (yields 6 custard pots)

For the custard;

  • 8 egg yolks
  • 1/2 cup organic cane sugar 
  • 3 cups organic heavy cream (full-fat coconut cream works too, for a dairy-free version)
  • 2 sprigs fresh mint
  • 1/2 teaspoon mint extract
For the reduction; 

  • 1 cup diced strawberries
  • 1 tablespoon minced fresh mint 
  • 1/4 cup organic cane sugar
  • 2 tablespoons water
  • 1 tablespoon water mixed with 1/2 tablespoon of cornstarch (create a slurry)
  • pinch of sea salt
For the whipped cream;

  • 2 cups organic heavy cream
  • 2 tablespoons raw honey
Preheat your oven to 320 degrees. Boil a pot of water.

In a medium size saucepan over medium heat, whisk together heavy cream, sugar, and fresh mint. Let simmer until it comes to a slight boil. Turn off heat and let mint steep for a few minutes. Strain hot milk into a bowl to get rid of the mint sprigs.  In a bowl, whisk together egg yolks until light. Slowly add hot milk to egg yolks, whisking constantly until well combined. Finish mixture with mint extract. Fill six custard pots in a baking dish about 3/4 of the way up. Pour boiling water into pan until halfway up the custard pots. Cover with foil, and bake for 30 to 35 minutes. Let cool, then move to the fridge and let cool at least 6 hours.

Now we are going to make the strawberry mint reduction! In a small saucepan over medium, combine strawberries, sugar, mint, and water. Let come to a slow boil. Add in cornstarch slurry and mix until thickened. Let cool and set aside until ready to use.

Time to make the whipped cream! Add cream to a cold stand mixer bowl. Beat on a high speed for about 3 minutes, or until peaks form. Add honey and continue whisking until fluffy.

When you are ready to serve, top the pots de creme with a dollop of the strawberry-mint reduction, as well as some whipped cream! Garnish with a mint leave, if desired. Enjoy!

-Juliet

Tuesday, March 14, 2017

Healthy Shrimp Burrito Bowls

Happy Tuesday! I am so excited to share this recipe with you all!
I can't speak highly enough about this amazing dish!! It is so simple to make, yet so delicious and flavorful! Not to mention it is super healthy for you as well; it is loaded with protein, healthy fats, and whole grains! This dish will surely make multiple reappearances at your dinner table! 
Let's get to cooking!

Healthy Shrimp Burrito Bowls (serves 4)
  • 2 cups brown rice
  • 4 cups water
  • 1 teaspoon sea salt
  • 1 lb shrimp (cleaned and tails removed)
  • 2 avocados, halved and sliced
  • 1 cup black beans 
  • 1 cup multicolored cherry tomatoes, halved
  • 1 cup sour cream 
  • Juice of 2 limes 
  • avocado oil, to grease pan 
  • homemade taco seasoning blend (2 teaspoons paprika, 1 teaspoon cayenne pepper, 1 teaspoon garlic powder, 1 teaspoon onion powder, 1 teaspoon black pepper, salt to taste)
  • fresh cilantro, to garnish
  • quartered limes, to garnish 
Add brown rice, water, and sea salt to a pot over high heat. Stir and bring to a boil. Once boiling, reduce heat to low, cover, and let cook for 20 minutes. 

Whisk together sour cream, lime juice, and a pinch of sea salt in a small bowl until it turns into a sauce. Set aside.

Lightly coat a large pan with avocado oil over medium-high heat. Once hot, add in shrimp and season with seasoning blend. Cook on each side for about 2-3 minutes, or until opaque. 

Once the rice and shrimp have finished cooking, it's time to assemble the bowls! First, scoop about 1/2 cup of brown rice into a boil. Top with 1/4 cup black beans, 2 slices of avocado, handful of cherry tomatoes, shrimp, and drizzle on the lime creme sauce. Garnish with cilantro and fresh lime wedge. Serve and enjoy!

-Juliet

Wednesday, March 8, 2017

Gluten-Free Singapore Street Noodles

I am so excited to share this recipe with you all! When I first tried Singapore street noodles, I absolutely fell in love with all of the flavors featured in the dish. The key flavor that is so perfect in this noodle dish is curry powder! The rice vermicelli noodles not only take on the flavor of the curry powder, but the gorgeous color as well! 
Not only is this dish absolutely delicious, it has many health benefits as well!! Curry powder contains turmeric, which is a natural anti-inflammatory, as well as ginger, which promotes a healthy immune system. So many reasons to cook this delicious & healthy meal!

Let's get to cooking! 

Gluten-Free Singapore Street Noodles (serves 4-6)
  • 20 ounces rice vermicelli noodles
  • 1 bunch of scallions, sliced (both white and green parts)
  • 4 cloves of garlic, minced
  • 1 tablespoon fresh ginger, minced
  • 1 yellow onion, medium diced
  • 3 large carrots, peeled and small diced
  • 1 1/2 cups red cabbage, thinly sliced
  • 3 bell peppers, small diced
  • 1/4 cup coconut aminos
  • 1 tablespoon ginger jam
  • 1/2 tablespoon rice vinegar
  • 1/2 tablespoon sesame oil
  • 1 teaspoon cayenne pepper
  • 2 tablespoons curry powder
  • salt and pepper, to taste
  • avocado or coconut oil, to grease pan 
First, we are going to make the sauce! Whisk together coconut aminos, sliced scallions, ginger jam, sesame oil, rice vinegar, cayenne pepper, salt, and pepper in a small bowl. Set aside.

Bring a pot of salted water to a boil. Once boiling, add vermicelli noodles and cook for about 3-4 minutes, stirring frequently. Drain, mix in a little bit of sesame oil, and set aside.

Coat a large pan or wok with avocado oil over medium-high heat. Once hot, add in onion, garlic, and ginger. Saute until translucent. Add carrots and peppers to the pan and saute until tender. Now add in the red cabbage and cook until softened. Season with salt and pepper. Pour in the sauce and let come to a slow boil. Add cooked rice noodles to the pan and stir. Season with curry powder and mix thoroughly. Serve with sliced scallions to garnish, and enjoy!
-Juliet


Monday, February 27, 2017

Gluten-Free Orange Chicken

Happy Monday! Here’s to another amazing week!
My inspiration for coming up with this recipe was my brother Harrison’s birthday! He absolutely loves Chinese food, so I decided to make a takeout themed menu! This orange chicken is so delicious! It has the perfect balance of sweet and savory flavors. I made this dish along with a noodle dish, which I shared a sneak peek of on my Instagram yesterday! You will find that recipe on here very soon!

Let’s get to cooking!
 
Gluten-Free Orange Chicken (serves 8)

For the chicken;
  • 3 lbs chicken breasts, cut into cubes
  • 1/2 cup orange juice
  • 2 cups white rice flour
  • 1 teaspoon cayenne pepper
  • salt and pepper, to taste
  • avocado oil, to fry chicken 
For the sauce; 
  • 3/4 cup orange juice
  • 1/4 cup coconut aminos
  • 1/4 cup raw honey
  • 1 tablespoon sesame oil
  • 2 scallions, sliced (use green and white parts)
  • 1/2 tablespoon minced fresh ginger
  • 3 cloves of garlic, minced
  • 1 tablespoons orange zest
  • 1/2 teaspoon cayenne pepper
  • 2 tablespoons arrowroot powder mixed with 2 tablespoons of water
  • sliced scallions, to garnish
  • sliced cara cara oranges, to garnish
Whisk together orange juice, aminos, honey, sesame oil, scallions, garlic, ginger, orange zest, cayenne pepper, and arrowroot slurry in a medium size bowl. Set aside.

Time to fry the chicken! Season flour with salt, pepper, and cayenne pepper. Coat a large pan with avocado oil. Coat cubed chicken in orange juice. Let excess juice drip off, then coat in rice flour. Fry chicken on each side for about 5-6 minutes. Add sauce to pan, stir, and let come to a slow boil. Serve chicken by itself, with rice, noodles, or whatever you desire! Garnish with scallions and oranges. Enjoy!
-Juliet

Monday, February 20, 2017

Ginger Greek Yogurt topped with Strawberry-Mint Reduction & Gluten-Free Granola

Happy Monday! I can't believe February is almost over! Spring is right around the corner!
This creamy ginger infused Greek yogurt topped with a delicious strawberry and fresh mint reduction is SO refreshing! And to top it all off, it is finished with my gluten-free almond butter granola! This dish has the perfect balance of sweet, spicy, and crunch! 
Onto the recipe!

Ginger Greek Yogurt topped with Strawberry-Mint Reduction & Gluten-Free Granola (serves 4)

  • 2 cups greek yogurt
  • 2 tablespoons ginger jam 
  • 2 tablespoons raw honey
  • 1 teaspoon fresh ginger, minced
  • 2 cups fresh strawberries, diced
  • 2 tablespoons fresh mint, minced
  • 1/4 cup organic cane sugar
  • 1/4 cup water
  • 1/2 tablespoon cornstarch mixed with 1/2 tablespoon water
  • 1/2 cup of my gluten-free granola 
Whisk together greek yogurt, raw honey, ginger jam, and fresh ginger in a small bowl. Wrap and refrigerate until ready to eat.

Add strawberries, mint, sugar, and honey to a small saucepan over medium heat. Stir constantly, and let come to a slow boil. Add in starch mixture and mix. Reduce and let simmer until mixture thickens. Let cool.

Time to assemble! You can put this in a bowl, parfait cup, or even a small mason jar! Layer yogurt, strawberry mint reduction, and granola. Serve and devour! Enjoy!

-Juliet

Monday, February 13, 2017

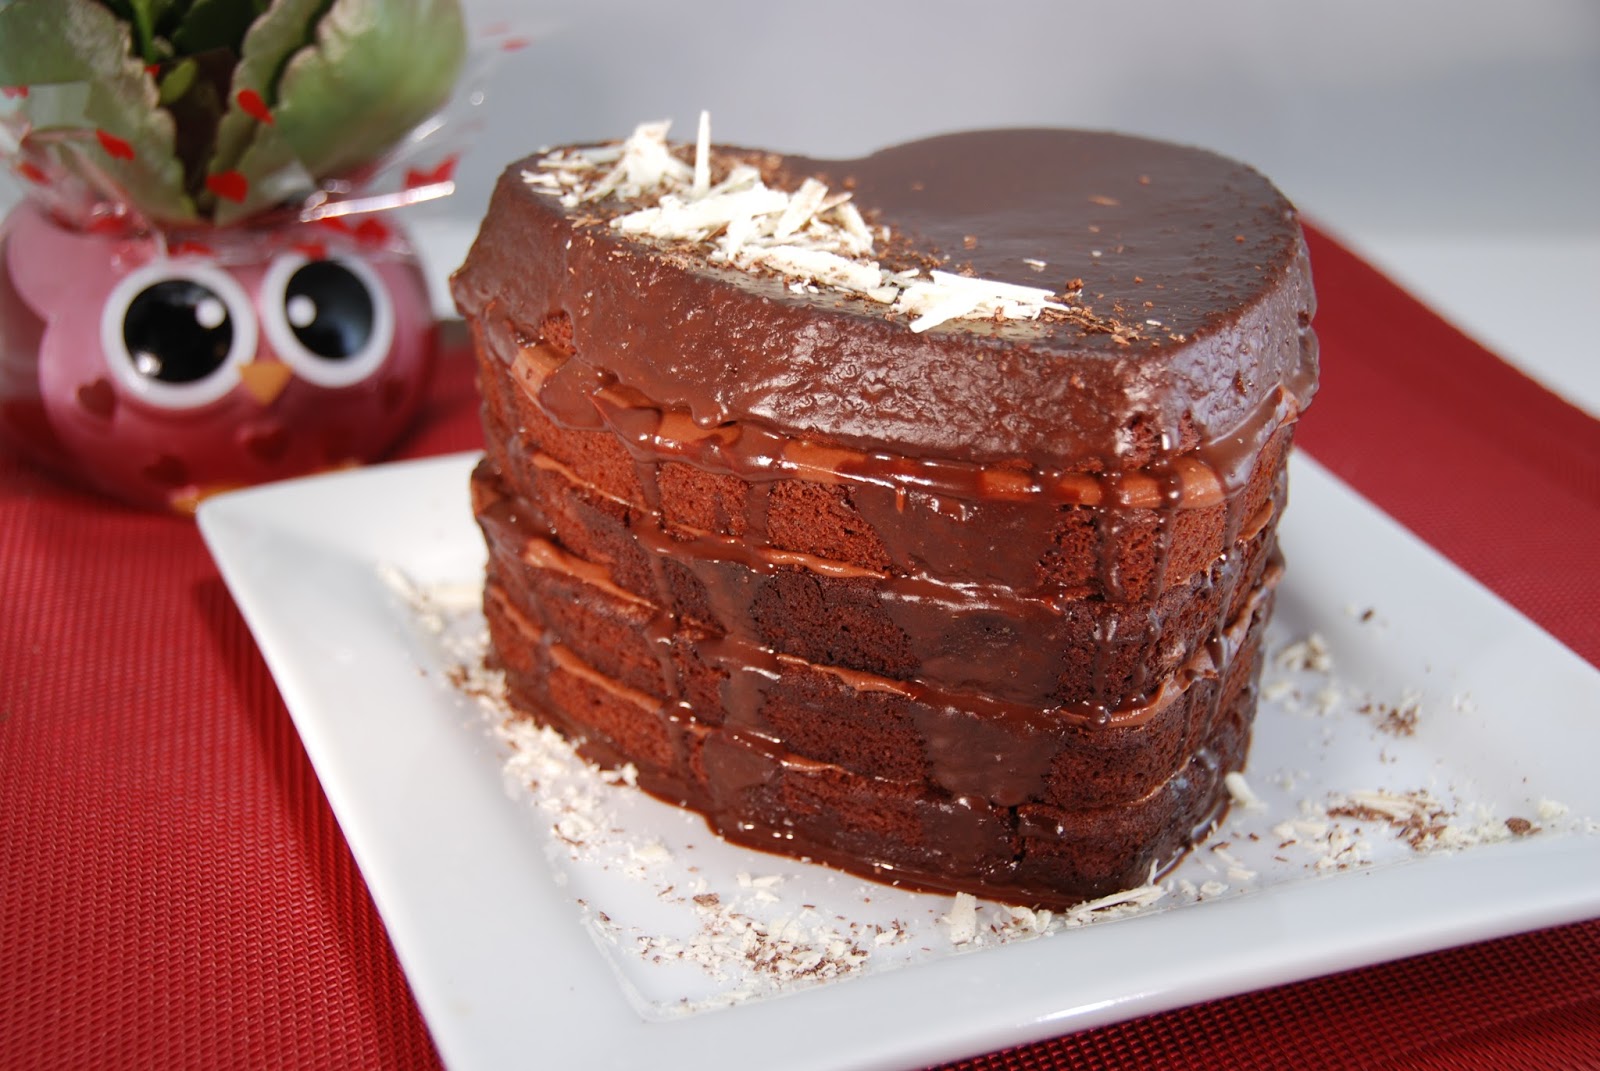
Red Wine Chocolate Cake with a Chocolate Buttercream & Blackberry-Sage Ganache

Hey there! Happy Monday! I hope your week is off to a great start!
If you are looking for the perfect gluten-free dessert to make for Valentine's Day, look no further! This red wine chocolate cake is moist, fluffy, and flavorful! The blackberry-sage ganache adds the perfect finishing touch to this elegant dessert. You will have a hard time believing this cake is free of not only gluten, but grain-free as well! Zuvii Banana Flour gives this cake great texture.

Onto the recipe!

Red Wine Chocolate Cake with a Chocolate Buttercream & Blackberry-Sage Ganache (yield; 5 heart shaped layer cake)

For the cake;
  • 1 cup banana flour
  • 3/4 cup cocoa powder
  • 1 1/4 teaspoon baking powder
  • 1 cup semi-sweet red wine
  • 2 large eggs
  • 2 sticks grass-fed butter, softened
  • 1 1/2 cups organic cane sugar
  • 1/2 teaspoon vanilla extract
  • coconut oil, to grease pans
  • garnish with chocolate shavings (I used dark chocolate & white chocolate)
For the chocolate buttercream; 
  • 1 stick grass-fed butter, softened
  • 2 cups organic powdered sugar
  • 1/4 cup cocoa powder
  • 1 tablespoon milk
  • 1/2 teaspoon vanilla extract
For the blackberry-sage ganache;
  • 8 ounces hot milk
  • 8 ounces 60% dark chocolate infused with blackberry & sage (I used Endangered Species brand chocolate.)
Preheat oven to 350 degrees. Grease 5 small heart shaped pans with coconut oil. Sift together dry ingredients in a small bowl.

Cream together butter and sugar in a stand mixer for about 3-4 minutes, or until light and fluffy. Add in eggs, one at a time. Beat again. Add in flour blend and red wine. Mix until well combined. Evenly divide batter among cake pans. Bake for about 35 minutes, or until a toothpick comes out clean.

Time to make the chocolate buttercream! Whip butter in a stand mixer until fluffy. Add in powdered sugar and continue mixing. Sift in cocoa powder, milk, and vanilla extract. Mix until well combined.

Let's make the ganache! Heat milk in a saucepan over medium heat until hot. Pour milk over chocolate and whisk until creamy.

Once the cakes are cooled, it is time to assemble and layer the cakes! Pipe buttercream on each layer, repeating until all five cakes are assembled. Pour ganache over cake and let set for a couple of minutes. Top with shaved chocolate. Enjoy!

-Juliet